
Function Purpose
1.To realize orderly charging of two EV Charger by centralized management of the remaining PV and remaining household electricity capacity assigned to the EV Charger.
2.Avoid disordered charging leading to equipment logic conMix and electricity consumption fluctuations.
3.Through the management of charging pile parallel machines, multiple charging pile equipments can be effectively integrated with resources, and the utilisation rate of charging pile equipments can be improved to meet the needs of many different electric vehicle owners.
Function Description
The primary EV charger obtains the surplus PV information through communication with the inverter(or CT sampling). It also controls the working current of the two EV charger according to the surplus PV information, the working status (charging/non-charging) and mode (Green/ECO/Fast) of the two EV charger and the household current limit value (main breaker).
Scenario
1. Photovoltaic Scenario(with Inverter)

Figure 1 With Inverter
Tips:
- Compatible Version:Home edition and Fusion edition.
- Both EV charger need to be of the same model and same rated power.
- Inverters need to be compatible.
2. Photovoltaic Scenario(with CT)
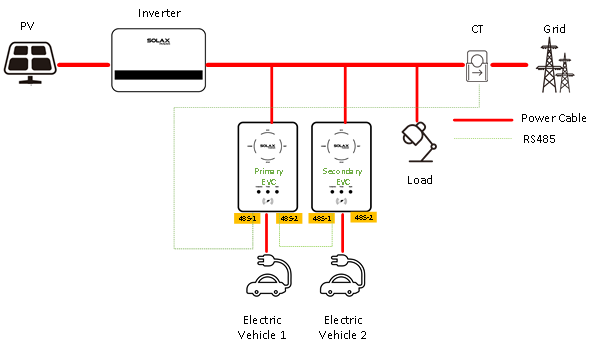
Figure 2 With CT
Principle:Primary analyses the current excess PV information to control the operating current of the charging pile by obtaining the current information of the feeder current at the utility side through the CT.
Adaptability:In this scenario, the inverter model can be any model that is not compatible with the charging pile and also inverters from other companies.
Note:In scenarios where the PV system has power limitations, the Green mode of the charging post can only be used properly when connected to an inverter.Reason: The inverter can give information about whether there is PV left or not to the charging post but the CT can't.)
3. Photovoltaic Scenario(With Meter)

Figure 3 With Meter

Figure 4 With Meter
4. Small Commercial and Industrial Scenario(Datahub centralizes dynamic load balancing for small EV charging stations, adjusting charger power based on real-time status and capacity data.)

Figure 5 Parallel with Datahub
Tips:
- Compatible Version:Home Commercial and Mix edition.
- Both EV charger need to be of the same model and same rated power.
Wiring&Set Up
1. Photovoltaic Scenario
With Inverter:Primary EV Charger's 485-1 communicates with inverter's com port. primary's 485-2 connects with secondary EV Charger's 485-1.The inverter com port connects with EV charger, address is 70, baud rate is 9600.


Figure 6 Wiring
With CT:Primary EV Charger's RJ45 port (485-1) is connected to the dedicated CT.Primary EV Charger's 485-2 is connected to Secondary's 485-1.
Port definition and app-side settings

Figure 7 Port definition and app-side settings

Figure 8 Parallel Setting(EV Charger)
When both units satisfy the working conditions, the allocation is done proportionally. When only one unit can satisfy the working conditions, the EV Charger with high allocation ratio will be given priority to satisfy the EV Charger with high allocation ratio, so as to ensure that the remaining PV is not discarded but is fully utilized.

Figure 9 Parallel Address and Baud Rate Setting(EV Charger)

Figure 10 Parallel Address and Baud Rate Setting(Inverter)
When we use the EV Charger in parallel, we need to set the baud rate and address of the EV Charger on the master side as well as on the slave side.
2. Small Commercial and Industrial Scenario

Figure 11 Wiring of Parallel with Datahub
Wiring:Datahub designates an RS485 port to connect to the meter and sets the corresponding interface to connect the device type to the meter and sets the number of devices and initial address.The other 485 port of Datahub is connected to the 485-1 of EVC, and the 485-1 of EVC is connected hand in hand in series. And set the corresponding interface to connect the device type as EVC and set the number of corresponding devices and initial address.EVC need to set the address, the default address is 70, the second unit in turn plus 1 to set.
Datahub Setting:

Figure 12 Datahub Setting
Datahub: No need to set the address of the devices themselves one by one, directly click on the automatic addition of devices.
Datahub will automatically assign the address to the connected devices.
The Datahub function is released at the end of March, the Fusion version V4.11 and the version after this will be supported by the software to be released.
The commercial version does not support the automatic address allocation.

Figure 13 Port definition and app-side settings
Comments
0 comments
Please sign in to leave a comment.